The beauty of working in creative mediums is that you always have the opportunity to grow and hone your craft. Photography is no exception to this, and with the way our tools and industry continues to grow by leaps and bounds, we photographers are in a perfect position to not only try new things, but to also look back on past work and see how our current editing skills and tastes can give us a fresh take on old images.
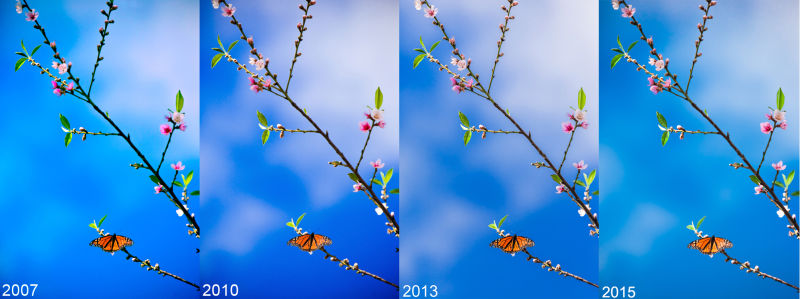
Now, the idea of going back through your catalog of RAWs and re-editing old photos isn’t new, and many people do it, but I find it inspirational to have the reminder to do so, and thus I hope this post inspires some of you out there to go for it! I first started choosing old images to re-edit in 2010. Adobe Lightroom has been my main editing tool for years now, and it’s a convenient way to keep a standard for editing your images. Starting with the RAW file reset to have no edits, I’ve processed this image of a butterfly since I took it in late 2007. The way I look at colors has changed, but so have the tools. Lightroom has improved its editing capabilities so much since version 1.0, and it has allowed me to pull more details from the same RAW file than I ever could before.
While it’s easy to say my processing style has improved over the years, my tastes have changed as well. The 2007 image is very saturated and has a lot of contrast. A lot of the more faded clouds below the branch lost their details to the saturation, and the branch itself is fairly dark. In the original shot, the branch was actually in shadow while the butterfly was highlighted. However, the 2010 shot has a drastic change, where I brought out more detail in the branch and reduced the contrast, but also tinted the blue to a more ultramarine than cyan. There is also more of a vignette on the overall image. 2013 appears to be a less-intensive version the 2010 shot, with the colors and tones being similar, though the sky is less saturated, and the branch’s details have been brought out more. toward the top, probably in part to there being less vignette. Finally, the 2015 image I edited this afternoon actually seems a bit more natural than all the other iterations. The branch is slightly darker, though the blossoms on it are less muddy, and the sky has gone back to being more cyan than ultramarine. The overall contrast on the image is less, and the butterfly is tinted more yellow-orange than red-orange. As long as I’m able, I’ll continue to revisit this image every couple of years and see what else I can do with it.
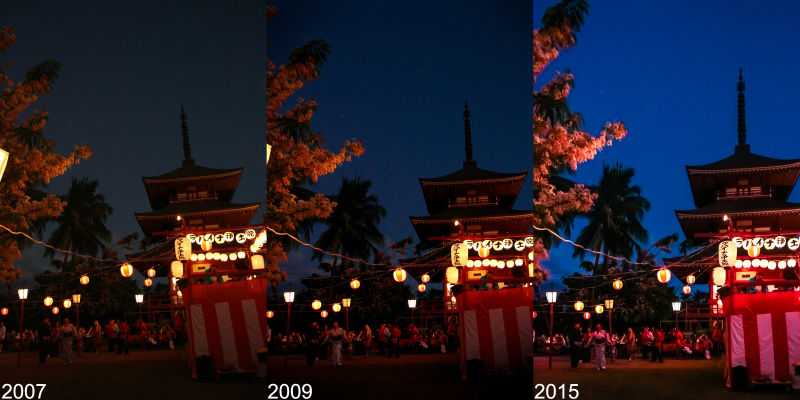
While editing a RAW file is like re-printing an image from the negative in a darkroom, some of you, like me, might have spent some time shooting in the simpler JPEG file format. Because it is a compressed file format, JPEG shots will always have less data to work with during your editing, but it’s still an interesting way to compare your history of editing. For this next image, I was shooting in an extreme low-light situation at a Bon Dance on Maui during the summer of 2007.
I was just starting to think in “artsy” photography shots, and had recently acquired the Canon EF 17-40mm f4.0L lens to shoot with on a Canon EOS Digital Rebel XT, but was still shooting in JPEG at the time. My composition wasn’t the greatest for the shot, but I did manage to capture a decent amount of detail shooting at 1/50 sec at f4.0 and 1600 ISO. I can’t find an edit of this image until 2009 (the 2007 image is the unedited JPEG), where I seemed to have editing the color/contrast to increase the depth of the image, and also work on reducing the distortion of shooting at 17mm, even on a cropped sensor. Still, the image is fairly dark and muddy, though the lanterns’ highlight details were retained. When I did my re-edit today, I tried to clean up the color and tones to be clearer, as well as re-introduce detail into the shadows in the lower half of the image. I also fixed the distortion using Lightroom 5’s upright tool, which incidentally also helped the composition by cropping out the lantern that was hanging right at the edge of the frame on the left side in the original image. I wish this image had been shot in RAW so I could push the details more, but I did my best to work with what I’ve got!
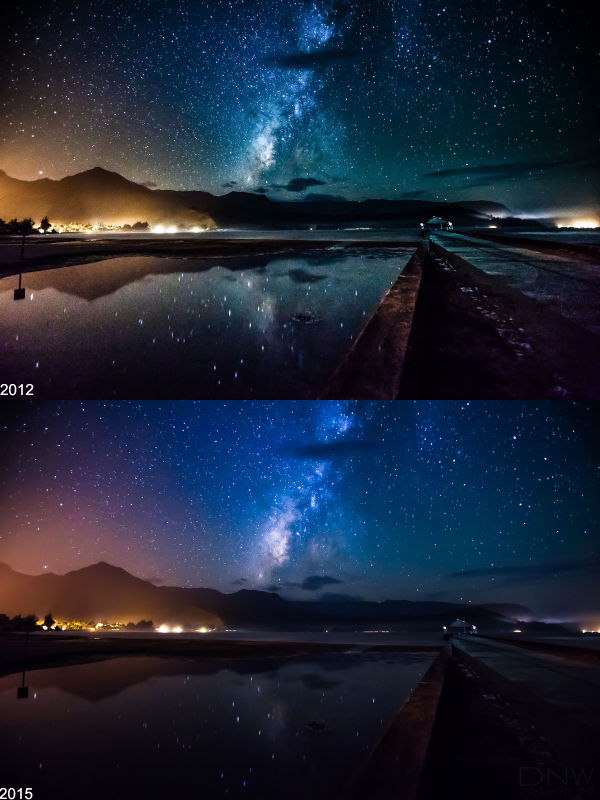
Finally, it isn’t always an image that is several years old that can teach you a lot about your personal growth as a photographer. In 2012 I seemed to be going through a phase where I was abusing Lightroom’s clarity slider, and thus ended up with some fairly messy-looking landscape images, including this one of the Milky Way over Kauai’s Hanalei Bay.
Most of my night/star shots from 2013 and older should probably be revisited, because I think my tastes in processing such shots has drastically improved. When you re-edit older work, you’ll probably find that you’ve moved toward a more controlled or subtle style, which usually comes with experience. Personally, back in 2012 I was out to make my landscapes as dramatic as possible, which led to some fairly overdone work. I would also complain about my 5D Mark II’s sensor, which suffered from thousands of hot pixels despite efforts to get it repaired, so I was always very self-conscious about the ugly noise in my night shots. However, while I have upgraded both wide-angle lense and camera body, this comparison shows that with the exact same RAW file, I have learned enough (and Lightroom has improved enough) to process this shot in what I consider a more tasteful, clean manner. This just goes to show you that it’s not always about improving gear, but also learning to develop your processing style.
I talked about this process using Lightroom as my main tool, because while the program improves the techniques for processing remain fairly similar, with taste and knowledge being the variable factors, but if you’ve learned new techniques or other programs, take your old RAW files and get to experimenting! Just last summer I finally learned about luminance masks, so I’ve also been trying new tricks on old images with that method.
Photography programs, style trends and especially gear will always be changing, but so is your own eye, style, and taste, and looking back on your old work to compare how you saw the world through your camera then and now is a fantastic way to study your own style and development. I hope I’ve inspired some of you to do so!


